To export the whole scene, open the Asset Editor, left-click on the arrow in the lower left corner of the render button , and press the Export V-Ray Scene File button . Another way is from the Extensions menu.
File Path – The name of the file. The file is saved in a custom folder, specified by pressing the Save File icon on the right.
Strip Paths – When enabled, all file paths of the assets in the vrscene are stripped down to file names. Conversion of the paths from absolute to relative allows safe vrscene transfer, as long as its asset files are moved to the same directory.
Hex for Meshes – Compresses geometry data in binary form to reduce its size, so it is preserved without any chance of round off errors.
Hex for Transforms – Compresses object transformation data in binary form to reduce its size, so it is preserve without any chance of round off errors.
Export – Exports the .vrscene file to the specified folder.
Column
width
5%
Column
width
35%
Image RemovedImage Added
Section
Column
width
60%
Exporting Through the Toolbar Button
To create a proxy through the V-Ray Objects Toolbar, select the group or component you want to export. The icon will remain inactive until an object in the scene is selected. When you select a group or component in the scene, the Export Proxy button will become active.
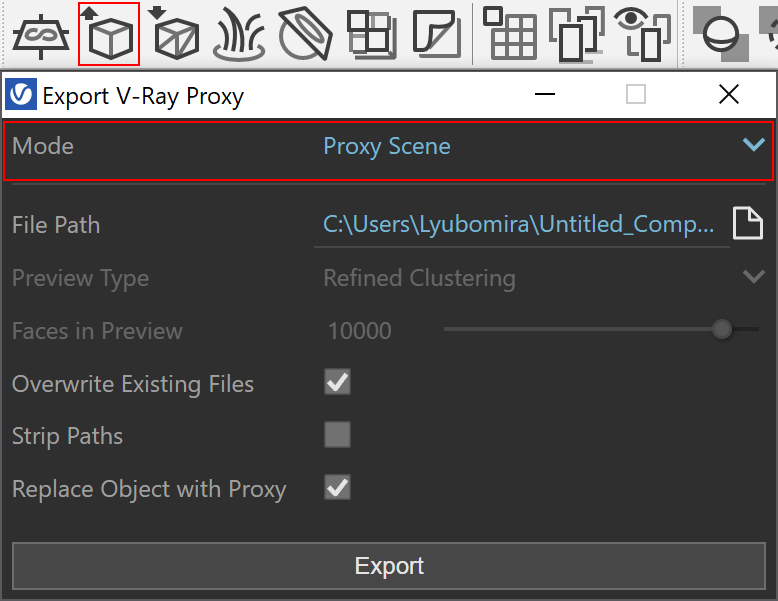
If you want to export a geometry selection, select the geometry and press the Export Proxy button. From the drop-down menu of the Mode option,choose Proxy Scene, and then press Export. Note that the geometry is exported together with its shaders and lightning.
Mode –Allows you to choose between Proxy Mesh (.vrmesh) and Proxy Scene (.vrscene) export. The addition of Proxy Scenes allows you to export a selection of geometry, lights, and special objects combined into a single proxy.
File Path – The name of the file. The file is saved in a custom folder, specified by pressing the Save File icon on the right.
Overwrite Existing File – When enabled, V-Ray automatically overwrites any existing file with the same name at the specified path.
Strip Paths – When enabled, all file paths of the assets in the vrscene are stripped down to file names. Conversion of the paths from absolute to relative allows safe vrscene transfer, as long as its asset files are moved to the same directory.
Replace Object with Proxy – If enabled, the source object is automatically replaced with its proxy version. Material assignments is preserved.
Export – Exports the .vrscene file to the specified folder.