This page provides details on the VR Teleport Blueprint, its functionalities, settings, and use.
Overview
On import of a .vrscene an interactive walkthrough can be generated. This is done using the VRay_TeleportPawn blueprint. If multiple cameras are present in the vrscene or in an additional vrscene file, they can be assigned as fixed views that can be switched at runtime.
VRayTeleportBlueprint
The VRayTeleportBP is separated as a plugin, just like V-Ray for Unreal, that you have to enable per project to use its functionality. To enable the plugin go to Settings > Plugins > Chaos Software > VRayTeleportBP and click the Enable checkbox. You will need to restart the Unreal project to use the plugin.

UI Path
||Modes Tab|| > Search Classes > VRay_TeleportPawn
||Content Browser|| > VRayTeleportBP Content > Teleport> VRay_TeleportPawn
The VRay_TeleportPawn Blueprint Actor is accessible through the Modes panel by searching for VRay_TeleportPawn or from VRayTeleportBP Content > Teleport> VRay_TeleportPawn in the Content Browser Tree. Select the Blueprint and drag and drop it in the level.
For the VRayForUnreal folder to be visible, you first need to enable Show Engine Content and Show Plugin Content in the View Options of the Content Browser.


.vrscene Camera Requirements
If your .vrscene file is set in a certain way, on import the Teleport Blueprint is created automatically and all cameras present in the vrscene file are populated in it. To get this functionality your vrscene has to meet these requirements:
- You have to have an additional vrscene file that contains the camera data. It must be in the same location as the original vrscene file that contains the geometry and materials data. The additional vrscene must contain the original vrscene name followed by _Teleports. In this example the original vrscene has the name House01.vrscene and the additional vrscene that contains the camera data has the name House01_Teleports.vrscene.

- Your scene camera/cameras in the vrscene file (that you wish to use in VR) need to have an appropriate naming convention "CameraPhysical physCameraXX ", "RenderView renderViewXX" and the "dont_affect_settings=true" parameter present in both of them

VRay_TeleportPawn Blueprint Settings
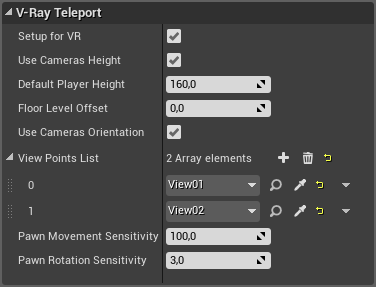
VRay_TeleportPawn Blueprint has the following settings:
Setup for VR – When enabled, sets the blueprint to work with an HMD device. This option is checked by default. If you do not have a HMD device disable this option.
Use Cameras Height – Uses the height of the View Points. If disabled, Floor Level Offset is used for all View Points.
Default Player Height – Player Height is used when Use Cameras Height is enabled.
Floor Level Offset – Adds offset to the HMD floor.
Use Camera Orientation – Orients the viewer along the View Point's original orientation.
View Points List – Sets the list of level cameras that the Teleport Blueprint will cycle trough.
Pawn Movement Sensitivity – Speed multiplier for the pawn movement in the level.
Pawn Rotation Sensitivity – Speed multiplier for the pawn orientation.
VRay_TeleportPawn Blueprint Usage
Automatic generation of VRay_TeleportPawn BP
If you have prepared your vrscene as mentioned in the .vrscene Camera Requirements you can follow the following steps:
In Unreal Editor’s Content browser (preferably, in an empty folder and empty level), click "Import";
Navigate to a vrscene and import it;
When the import process is done, supported assets should be created in the Content browser and placed as actors in the level. Each actor has assigned material(s) with their parameters properly set. A Teleport BP actor should be created and all the cameras assigned to the correct slots in the blueprint.

Manual generation of VRay_TeleportPawn BP
If you have prepared your vrscene as mentioned in the .vrscene Camera Requirements you can follow the following steps:
Search for the VRay_TeleportPawn in the Modes panel and add it to your scene;
In the VRay_TeleportPawn’s Details, in the View points list, add as many elements as the number of cameras you wish to use;
Populate the list with the cameras. Note, that the order in which the cameras are listed determines the order views are going to be ordered at runtime.

Setup and Controls in Play Mode
In order to use the VRayTeleportBP in a packaged project you need to enable it in the Game Mode for this level. To do this Window > World Settings and in the Game Mode category choose VRGameMode in the GameModeOverride drop down menu.

You have the option to set the blueprint to work with a HMD device or on a regular display, by adjusting the “Setup for VR” checkbox. This option is checked by default. If you do not have a HMD device disable this option.
If "Setup for VR” is disabled you have the following controls:
- Use the WASD keys on the keyboard to navigate the movement of the current camera;
- Use the mouse to look around with the current camera;
- Use the Left and Right keys on the keyboard to switch between cameras in the View points list;
If "Setup for VR” is enabled you have the following controls:
You can look around and navigate the current camera with the headset (VIVE only);
Use the controller triggers to switch between cameras in the View points list;
Switching between View points will reset the camera to its initial state and will not remember any position/orientation changes that you previously made in that View point.
