Overview
This tutorial is a general guideline on how to export geometry through the alembic format and render it with V-Ray for Maya.
It resolves some current limitations in the alembic import and shows how to easily use Custom attributes workflow from Houdini to V-Ray for Maya.
The Houdini setup will not be discussed in detail. You can check the provided .hip file available for download.
General Information And Considerations
Custom Attributes
All custom point attributes are preserved and can be accessed through the VRayUserColor Texture. You need to feed it to a material and apply that material to a V-Ray Proxy.
A few notes on custom attributes:
If you use a Wrangle node to create a v@my_vector = rand(@ptnum); attribute, Houdini will generate a 3flt class attribute. This will work just fine inside Houdini but if the point cloud is exported as is to Alembic, V-Ray won't be able to use the attribute at render time. As per the Alembic format specifications, V-Ray only supports color3 and color4 attributes. Therefore, when you middle-mouse-button click your Houdini node, my_vector should read as my_vector 3flt (Vec) or my_vector 3flt (Clr). Simply put, my_vector 3flt will not work. You can force Houdini to give you a Vec or Clr class attribute by creating your attribute using an Attribute Create node and then modifying it in the Wrangle node.
Attempting to feed a custom float attribute to a vector input of the V-Ray material directly from the VRayUserColor to the material will produce incorrect renders. Especially if you have many attributes stored in the file. Every 3 Float attributes are represented as a single vector/color attribute - @my_first_float , @my_second_float and @my_third_float will be loaded as the components of a single vector attribute. You need to make sure that you select the correct Out Color component of the VRayUserColor texture.
For the purpose of this tutorial, when we save 3 float attributes into a color attribute, we name them in the order of the three color components - R, G, B. For example, when saving the Flowers, we named the color attribute "leaf_middle_strand" to correspond to the three parts of the object - the leaves (R), the middle part (G) and the strand (B).
VRayMesh file info
Information about the UV sets and attributes available in the alembic file can be found in the VRayMesh file info rollout.

Geo Nodes
The Houdini file is organized such that the elements of the scene are separated in individual Geometry nodes whose display flag is disabled. To control their visibility, use the toggle options on the /obj/Display_Controls node.
The scene consists of the following nodes:
- concrete – generates the layer of concrete and the steel reinforcement. Use the ROP Alembic Output nodes inside to export:
“OUT_CONCRETE_LPoly.abc” – Animation of the low poly concrete.
“OUT_WIRE_MESH.abc” – Animation of the steel in the concrete.
- bricks – generates the bricks for the walls.
“OUT_FACADE_EAST.abc”, “OUT_FACADE_WEST.abc”, “OUT_FACADE_NORTH.abc”, “OUT_FACADE_SOUTH_01.abc”, “OUT_FACADE_SOUTH_02.abc”, “OUT_FACADE_SMALL_WALL.abc” – Brick animations for each wall.
- stucco. Animation of the wall plaster.
“OUT_STUCCO_LPoly.abc” – Low poly animation of the wall plaster.
- roof. Animation of the roof tiles.
“OUT_ROOF.abc”, “OUT_ROOF_CAP_BRICKS.abc” – Animation of the two roof tile types.
- roof_wood. Animation of the wooden beams.
“OUT_ROOF_WOOD.abc” – Animation of the beams.
- windows. Animation of the windows.
“OUT_EAST_WINDOWS.abc”, “OUT_NORTH_WINDOWS.abc”, “OUT_WEST_WINDOWS.abc”, “OUT_SOUTH_WINDOWS.abc”, “OUT_FRONT_DOOR.abc” – Animation of windows by wall and animation of the entrance door.
- balcony. Animation of the balcony rails.
“OUT_BALCONY_SOUTH.abc”, “OUT_BALCONY_WEST.abc” – Animation for each of the balconies.
- grass. Animated grass growing.
“OUT_GRASS.abc” – Animation of the grass. Here the animation involves not the geometry itself, but rather the values of the attributes.
- flowers. Animated growth of the flowers.
“OUT_FLOWERS.abc” – Animation of the flowers.
- reference_model. Here the model of the house is loaded from a .fbx file and is separated into walls and elements for easier navigation when doing the animations.
You can generate the high poly models of the concrete and the plaster out of the “Concrete_Stucco_VDB_ROP” file.
To keep the alembic file size smaller, the geometries are packed prior to the export.
To get a more fluid look, the concrete and the outer plaster in the video are converted into very thick VDBs. To keep the file size small, they are written as low poly. You can export high poly geometries for these objects from the Houdini scene packed and available for download. Keep in mind, that if exported as high poly, the full size of the working files exceeds 23 GB.
Maya Scene
Let's load the scene in Maya.
The scene is lit using a V-Ray Sun and Sky system.

Importing the Alembic Files
All alembic files are imported as separate V-Ray Proxy objects.
The object names are the same as the alembic files, only the "OUT_" prefix is removed.

Playback type is set to Once.
Start offset coincides with the rotation of the camera. Each alembic file is with its own timing offset:

Scale
The measuring units in Houdini are meters while Maya uses centimeters by default – this may affect the intensity of your lights.
To eliminate potential issues, either group all objects and set the group's uniform scale to 100, or scale the objects individually.

Materials
In this section, we go into detail how the materials for each object in the scene are created.
Since all objects are alembic proxies, we can read their Color sets as attributes with VRayUserColor. At times, we'll only need one component from the color attribute (e.g. the red or green channel).
Primitive groups created in Houdini are preserved and accessible through the V-Ray Proxy as Shader sets (can be seen under the VRayMesh File Info roll-out). To isolate a material assignment to a specific primitive group/shader set, assign a V-Ray Mesh Material to your Proxy object and connect the desired material to the respective Shaders[] input of the Mesh material.
Concrete Wire Mesh Material
To create this material, we use a color set from the alembic file.
The material is entirely diffuse with no reflections or refractions.
This material is applied to the wire_mesh object.

To create color variations, we use the Cd attribute exported from Houdini and saved in the alembic file. Note that this attribute is randomized for each wire and is written as Point Class in Houdini.
We can take the name of the Cd attribute from the VRayMesh file info rollout and use it as a User attribute name in a VRayUserColor texture.

Since the color variations are in the range from black (0, 0, 0) to white (1, 1, 1), we need to reduce the difference range.
To do that, we use a remapColor texture. We only need to change the values of the Output Min and Output Max parameters and set them to 0.3 and 0.5.

Then, we use a colorComposite texture to multiply the remapped color variations by a constant color value to introduce some coloring to the black and white variation range.
We set Color A to a constant color [RGB 1.194, 0.135, 0.1], but any suitable color can be used.
We connect the remapColor node to the Color B input and set the Operation to Multiply.

Bricks Material
For the bricks material, we use the UV and color sets from the alembic file. This material is applied to facade_east, facade_north, facade_south_1, facade_sout_2, facade_west, facade_small_wall objects.
We can take the attribute names from the VRayMesh file info rollout.
We use "Bricks_G_Bump_01.jpg" as a Bump map for the bricks. The file can be downloaded with the tutorial assets.
The texture coordinates are generated in Houdini and imported in Maya as a UV set with the geometry. V-Ray will find the UV coordinates automatically.
The diffuse color of the material is generated in Houdini and is different for each brick. This color attribute Cd is accessed with a VRayUserColor texture.
Just as with the Concrete Wire Mesh material, we can introduce some color variations, as the color range is from black (0, 0, 0) to white (1, 1, 1). Again, we use a remapColor texture to do this.
We only change the Output Min and Output Max values to 0.625 and 0.675.

Exporting the color and UV attributes
The Cd color attribute is written as Class Point. The UV map attribute is Class Vertex.
Both have to be written before packing the geometry.
The uv attribute should be named conventionally for V-Ray to recognize and use it at render-time. The attribute should appear in the VRayMesh File Info dialog in Maya under the UV sets field as 'uvmap1'. If multiple UV sets are required or your setup does not permit this, you may add V-Ray Placement Attributes to the place2dTexture nodes in your scene and specify the name of the custom uv attribute under the UV Set Name field.

Concrete Low Poly Material
For this material, we use UVs from the UV set in the alembic file.
The diffuse and bump textures are mapped with a place2dtexture, that automatically locates the UV set in the alembic file.
This material is applied to the concrete_LPoly object.

Concrete High Poly Material
This material is applied to the Concrete_HPoly object.
The UV coordinates are transferred from Houdini to Maya as Color attributes and then accessed with VRayUserColor.
Use the Houdini scene to export the high poly model of the concrete.
This can be done in a few ways:
Option 1: Using Shader Sets
We can use shader sets in the proxy mesh material.
In the VRayMesh file info, you can find information about the number and type of shader sets in the file.

The VRayMeshMaterial that is automatically created when importing the VRayProxy allows assigning materials by shader sets.

When imported in Maya as an alembic proxy, the Houdini primitive groups are detected as Shader sets.
In Houdini, polygons with a material assigned on the outside are placed in a different primitive group than the ones with a material on the inside.

Concrete High Poly Shader Sets Material
The Concrete In material is used for the inner sides of the concrete, while it is being laid down.
The Concrete Out material is for the surface of the laid concrete.

To assign textures to the two materials, we use two different UV channels that are exported as user attributes.
They are accessible through a VRayUserColor texture.
Since VRayUserColor only works with color attributes, the attribute needs to be a container or a pack of 3 float attributes when exporting from Houdini.

uvmap_in contains the texture coordinates of the inner polygons of the concrete, and the UV channel is a Class Vertex. The color attribute is also written there.

uvmap_out contains the texture coordinates of the concrete surface, also written as Class Vertex.

coll_out has 2 float attributes and the 3-rd one is 0.
The first one, coll, is a mask for separating the columns from the slab. The second one, out, is used for separating the surface from the inside of the concrete.
This attribute is written as Class Point.

Inner Concrete Material
A File texture loads "Stone_A_Bump.jpg" to be used for the Diffuse Color. The file can be found in the tutorial assets.
Then, we use "Gravel_D_NM.jpg as a Bump Map.
The Reflection color and glossiness are changed, so that the material resembles wet surface.

Texture Coordinates
We use a VRayUserColor to access the texture coordinates from the uvmap_in attribute. We then connect Out Color R to U Coord and Out Color G to the V Coord of the file texture nodes. This way we use the coordinates .

Surface Concrete Material
We only use Diffuse and the Bump textures for this material.
The difference between this material and the Inner Concrete material is that we change the scale of the texture coordinates imported with the color attribute.

We connect Out Color R and Out Color G to the U and V coord inputs. This time, we use a floatMath node to re-scale the textures.
We need to set uvmap_out as the User attribute name for the VRayUserColor.

Let's look at the float nodes. Output Float goes into the Float B input of the floatMath nodes, here renamed to rescale_V and rescale_U for ease of use.
The Float value is set to 4 and the Math Operation is set to Divide.
Since the Float B input has a value of 4, the texture coverage will be 4 times larger.

In these images, we can compare the results with and without scaling the textures.

Since Shader sets are done per polygon, this leads to visible sharp transitions between the inner and outer surface materials.
To avoid this unwanted effect, we use a V-Ray Blend material.

Option 2: Using a Blend Material
This material uses a component from the alembic Color set.
Concrete High Poly VRayBlendMtl Material
We use the same Concrete_In and Concrete_Out materials created previously, but this time we connect them to a VRayBlendMtl, so that Concrete_In is the Base Material and Concrete_Out is Coat Material 0.
To blend the two materials, we use the third color set from the alembic file, coll_out. The values of this attribute can be used as a shading mask in Maya.
The red channel (Out Color R) of collumns_in_out_mask can be used to mask the columns.
The green channel (Our Color G) of Concrete_Out can be used to mask the outer surface of the concrete.

Тhe coll_out attribute can be accessed with a VRayUserColor texture. Since we are only interested in the Green channel, we connect it to the three inputs of the Blend Amount 0.
Let's render again and see how the transition looks now.

Now the transition looks a lot smoother than before.

Wood Planks Material
This material is used for the wooden planks under the roof and the railing on the terrace (applied to the balcony_west, balcony_south and roof_wood objects).
It uses UVs from the alembic UV set.
Wood_Planks_C_Diff0.jpg is for the Diffuse color.
Wood_Planks_C_Bump.jpg is used for the Bump map. Both textures can be found in the tutorial assets.
The two maps use a place2dTexture that automatically finds the UV coordinates in the alembic file.

Roof Clay Material
This material uses UVs from the alembic file.The color comes from the color set in the alembic file.
The material is applied to the roof_bricks and roof_cap_bricks objects
Clay_B_Diff_01.jpg is used for the Diffuse color, and Clay_A_Refl_01.jpg is used as a Reflection map.
Both maps are connected to a place2dtexture that reads the texture coordinates from the alembic UV set.

We do a test render and see that the result is too uniform and the roof looks flat.
There is no color variation yet, as the texture is directly connected to the Diffuse slot.

Let's add some variation to the color.
Create a VRayLayeredTex and add a layer by clicking Add New Item. Connect the Out Color of the Clay_B_Diff texture to the Layer[0] slot. Leave the Blend Mode at Normal.
The Out Color of the Layered texture should go to the Diffuse Color of the material.
Then, create a VRayUserColor and set the User attribute name set to Cd so we can access the geometry color. The Cd attribute is randomized for each brick tile and is written as Point Class.
Use a remapColor texture and change the Output Min value. This way, we can control the contrast between the different tiles.
Create two more layers on the VRayLayeredTex. Connect the remapColor texture to Layer[1] and set the Blend mode to Multiply.
Create a VRayDirt texture, change only the Radius parameter to 5.0 and connect it to Layer[2] with the Blend mode set to Multiply.

Now when we re-render, there are seemingly random variations in the color.
Here's a render with Output Min set to 0.75 on the remapColor node. The default value of 0.0 makes the variation too exaggerated.


Stucco Material
For this material, we use Triplanar mapping. The material is applied to the stucco_LPoly and stucco_HPoly objects.
We need two VRayTriplanar textures, where we connect Stucco_C_Bump (for bump mapping) and Stucco_C_Diff_01(for diffuse color) to the Texture X slots of the two Triplanar maps.
With the help of a floatConstant texture, we can control the texture scale in both of the Triplanar nodes, so that they have the same dimensions.

Door Material
To create the Door Material, we use the UVs from the alembic file and a component from the color set. The material is applied to the front_door object.
We can use the Wood material created before for roof planks and the terrace railing (see the Wood Planks Material).
VRaySwitchMtl is perfect for this task. Connect the Wood material as Material 0 in the VRaySwitchMtl.
Then, create a new VRayMtl and connect it as Material 1. We use the switch material for the door handle.
For the new VRayMtl, make the Diffuse Color darker. Then set the Reflection Color to white and the Reflection Amount to 0.9. Feel free to adjust those parameters to your liking.

To control what part of the geometry gets which material, we use VRayUserColor to read the handle_others attribute and pass it as a Switch input to the VRaySwitchMtl. Use the Out Color R output of VRayUserColor to make the connection.
In Houdini, we've used an Attribute Create node to specify a new attribute called handle_others, which was then written as a Color set in the alembic. The @handle uses an attribute value of 0 for the wooden parts and a value of 1 for the handle itself.

Windows Material
To make this material we use UVs from the alembic UV set and a component from the Color set. This material is assigned to the east_windows, north_windows, west_windows and south_windows objects.
We reuse the Wood material and connect it to a new VRaySwitchMtl as Material 0. Create a new VRayMtl for the glass and set it as Material 1 in the VRaySwitchMtl.
Then we make a new VRayMtl for the granite and connect it as a Material 2 in the switch material.
To control what part of the geometry gets which material, we use VRayUserColor to read the material_indexes attribute and pass it as a Switch input to the VRaySwitchMtl. Use the Out Color R output of VRayUserColor to make the connection.
The material_indexes attribute was specified in Houdini before packing the geometry, using a Create Attribute node. Only the red channel was used with a value of 0 for the wooden frame, 1 for the window pane and 2 for the granite sills.
This way, even though the windows geometry is a single object, each part gets the correct material based on the attribute name.

For the Glass material, the Diffuse Color is set to Black, as glass does not have diffuse color.
The Reflection Color is a light gray and the Reflection glossiness is set slightly below 1 (0.98).
Glass is refractive, so the Refraction Color is light gray. Refraction glossiness is set to 0.980. IOR is set to 1.530 (generally, the IOR of glass is 1.5) and a light blue tint is introduced by using the fog color with the Fog multiplier set to 0.3.

For the Granite material, we use Granite_E_Diff.jpg as the Diffuse texture. The place2dtexture is automatically created and finds the UV coordinates from the alembic file.
We introduce some reflection to the material by changing the Reflection Color to mid-gray and we lower the Reflection glossiness to 0.85.

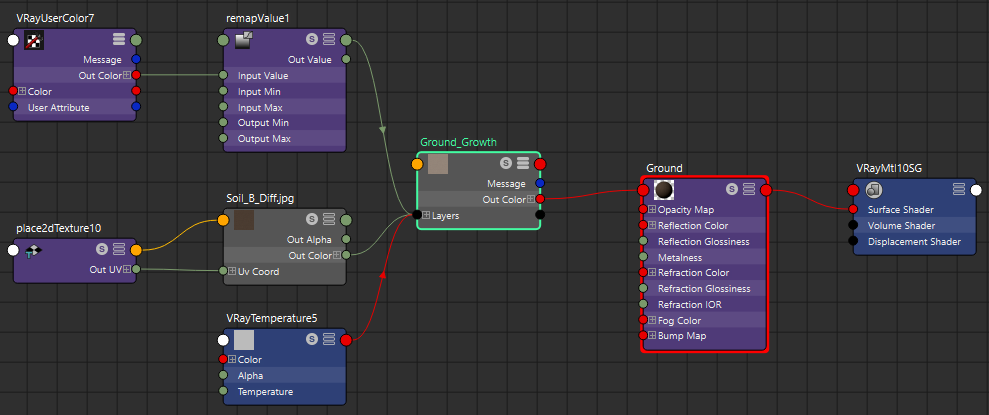
Ground Material
For this material we use the UVs from the alembic file and a component from the alembic Color set. The Ground material is applied to the ground object in this scene.
To create the effect of gradually uncovering the ground texture with grass growing on it, we use a VRayLayeredTex with two layers.
Leave all parameters at their defaults on the first layer – the diffuse will be mid-grey and the blend mode should be set to Normal.
Use the Soil_BDiff.jpg texture as Tex Input for the second layer.
To make the wave-like effect, we use a VRayUserColor to access the grass_bend_rnd attribute.
- The red channel of this attribute stores the grass growth animation, created with a solver in Houdini.
- The green channel stores some noise generated in Houdini, that we use to bend the grass.
- The blue component stores another type of noise that can be used for additional randomization of the grass, but we do not use it in this tutorial. Feel free to try it yourself.
We only need the red channel for this material, but we'll use the other two channels later.
Create a remapValue node and connect Out Color R from the VRayUserColor as input value. Add a new point to the remapValue's Color ramp at a position of 0.0075 and set the color to white. This will come in use when we make the Grass material in the next step.
Connect the remapValue as the Mask of the second layer in VRayLayeredTex.
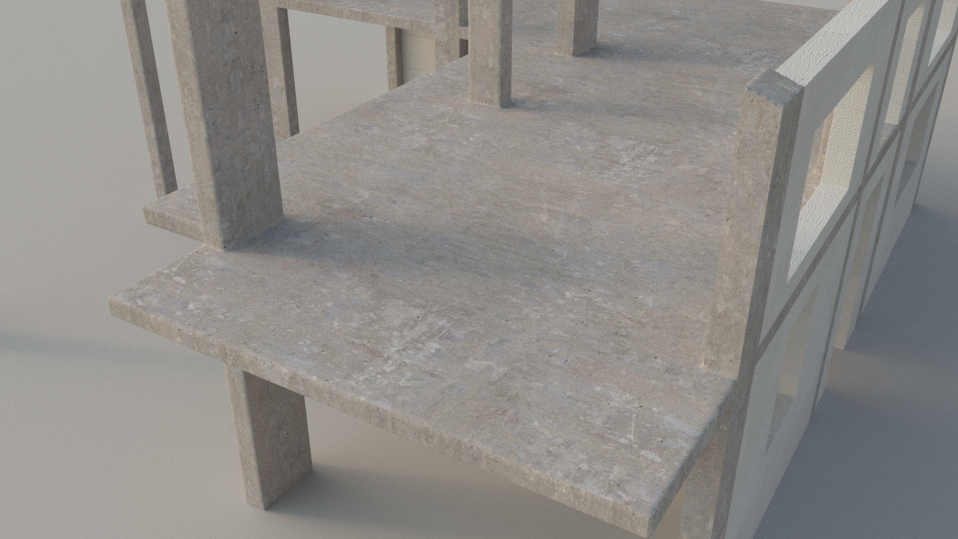
Here is a render comparison of the ground with and without Color remapping.


Here's how we create the grass.
Select the ground object and add VRayFur to it.
Select the VRayFur and set the Length to 25, Bend to 0.5 and Distribution Per Face to 8.

Create a new VRayUserColor texture and add the grass_bend_rnd attribute name.
Connect Out Color R and Out Color G to two separate remapValue nodes.
Then, connect the two remapValue nodes to Length texture and Bend texture of the VRayFurProperties.
Out Color G controls the bend value. The only thing to change is the Output Min, which is set to 0.3.

Out Color R accesses an animated attribute, which controls where the grass is growing.
Let's connect it to a RemapValue node and make a Value curve similar to what is shown in the image.
This way, the grass will start spreading outwards like a wave with a peak in the beginning and then decreasing to the desired value.

Here is the rendered results of the growing grass with and without remapping. You can clearly see the wave-like effect done with the remap curve.


Grass Material
We use a VRayFurSampler for the grass material, which is assigned to the GrassPreview object.
Create a VRayLayeredTex and connect it to the diffuse slot of a VRayMtl to help us introduce some variations in the grass blades.

The main color of the grass is done with two Ramp nodes. We use the Distance Along Strand output of the VRayFurSampler to drive the V Coord of the Ramps.
The ramp is then set as a Layer[0] of the VRayLayeredTex.
The colors of the ramp are adjusted to resemble real grass colors.
A second ramp texture is used in Layer[1] of the VRayLayeredTex with slightly darker colors to introduce more color variations. Feel free to adjust the color to your preference.

We use the remapValue texture to set the Input Min parameter to a value of 0.7 to allow 30% variation to the grass blades.

Flowers Material
The flowers material uses a component from the alembic Color set. The material applied to the flowers object in this scene.
We use another VRayLayeredTex as the diffuse for a VRayMtl.
There are 3 layers in the texture:
- Layer[0] is used for the leaves of the flower and is set to a white color;
- Layer[1] is used for stamen of the flower and is set to a yellow color;
- Layer[2] is used for the stem and is set to a green color.
To distribute the correct materials to the correct parts of the flower, we use a VRayUserColor. The attribute we feed to it is leaf_middle_strand from the alembic. Each color component (R, G, B) is used as a mask for the different flower part.
Then, we connect the VRayUserColor to the Layered texture as following:
- Out Color R is connected as a Mask to Layer[0];
- Out Color G is connected as a Mask to Layer[1];
- Out Color B is connected as a Mask to Layer[2].
