
This page provides information on how to get V-Ray for Blender up and running.
Overview
This guide is to serve as a reference for installation of V-Ray for Blender.
You can download the latest official version of V-Ray for Blender from http://www.chaosgroup.com with the account supplied to you by Chaos Group or your reseller.
If you experience any problems please check the Troubleshooting section. If you are still having problems please contact Chaos Group Support.
In order to render with V-Ray, you need V-Ray for Blender, a custom build which consists of:
- V-Ray Standalone
- A custom build of Blender which has optimized export functions
- V-Ray for Blender scene exporter
Additional pages in this section cover setting up Distributed Rendering.
Installing V-Ray
The V-Ray installer for Blender is pretty straightforward and easy to follow and can be downloaded from the Chaos Group website (please make sure you use your login credentials to ensure access to the download links). It's recommending that before installing V-Ray, please make sure your computer meets the System Requirements for running Blender with V-Ray. If you would like a step-by-step guide, please check out the Install V-Ray for Blender page. If you run into any problems, please check out the Troubleshooting page.
Initial Setup of V-Ray for Blender
To run V-Ray for Blender go to Windows Start > All Programs >VRayBlender 2.xx> VRayBlender.
1. Enable the V-Ray Add-on. Go to File > User Preferences > Add-ons and enable Render: V-Ray For Blender 3.0.

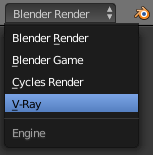
2. Choose V-Ray as a rendering engine as shown in the image below. To enable the preview of materials and textures using V-Ray, you need to select V-Ray(material preview) as a render engine.
3. Set up the render preview. V-Ray has its own frame buffer used to preview the rendered image. To avoid rendering in both the V-Ray and native Blender frame buffer, go to the Render setup and in the Render panel set the Display parameter to Keep UI.

4. Set up the V-Ray Standalone connection. V-Ray For Blender will automatically detect any V-Ray Standalone installation using V-Ray's environment variables. Since there may be more than one V-Ray Standalone installed, V-Ray for Blender will search for the installation path according to the following hierarchy:
%VRAY_PATH% – This variable shows where V-Ray Standalone is installed.
%VRAY_FOR_MAYA_% – This variable shows where V-Ray for Maya is installed .
%PATH% – This variable allows you to manually specify the location of V-Ray Standalone.
If you need to manually specify the vray.exe that you want to use, you can disable the Detect V-Ray checkbox in Blender User Preferences > Add-Ons > Render: V-Ray for Blender 3.0. This will show you the Path field which you can use to specify the location of the V-Ray Standalone execution file.

5. Set up the Exporter. V-Ray for Blender is set up to work in two stages. In the first stage, the scene is exported to a .vrscene file. Then it is transferred to and rendered by V-Ray Standalone in the second stage. For that to happen, the Exporter will save the scene in a temporary folder on your hard drive:
Windows: C:\Users\%USERNAME%\AppData\Local\Temp
Linux: /tmp/
OS X: /var/folders/xg/<tmp-value>/
You can also manually set the folder to which the .vrscene is exported. To that, go to the Render settings and navigate to the System tab. In the Exporter panel, set the Directory parameter to Custom Directory. You will be able to specify a location in the field below.
