This page provides information about batch rendering in Chaos Cloud.
Overview
Chaos Cloud offers batch rendering of jobs exported from V-Ray for Rhino and V-Ray for SketchUp, as well as batch rendering of multiple cameras exported from 3ds Max. See below how to start a batch rendering process from each of the host apps.
Submit from V-Ray for Rhino
To submit a batch of render jobs from V-Ray for Rhino, first open the Batch Render window.
Select the views you want to submit and press the Cloud Batch Render button. Rhino prompts you to save the scene with the newly selected views.
A progress window appears, while the Chaos Cloud app iterates through the views.
Finally, the Cloud submission screen appears in your browser.
Submit from V-Ray for SketchUp
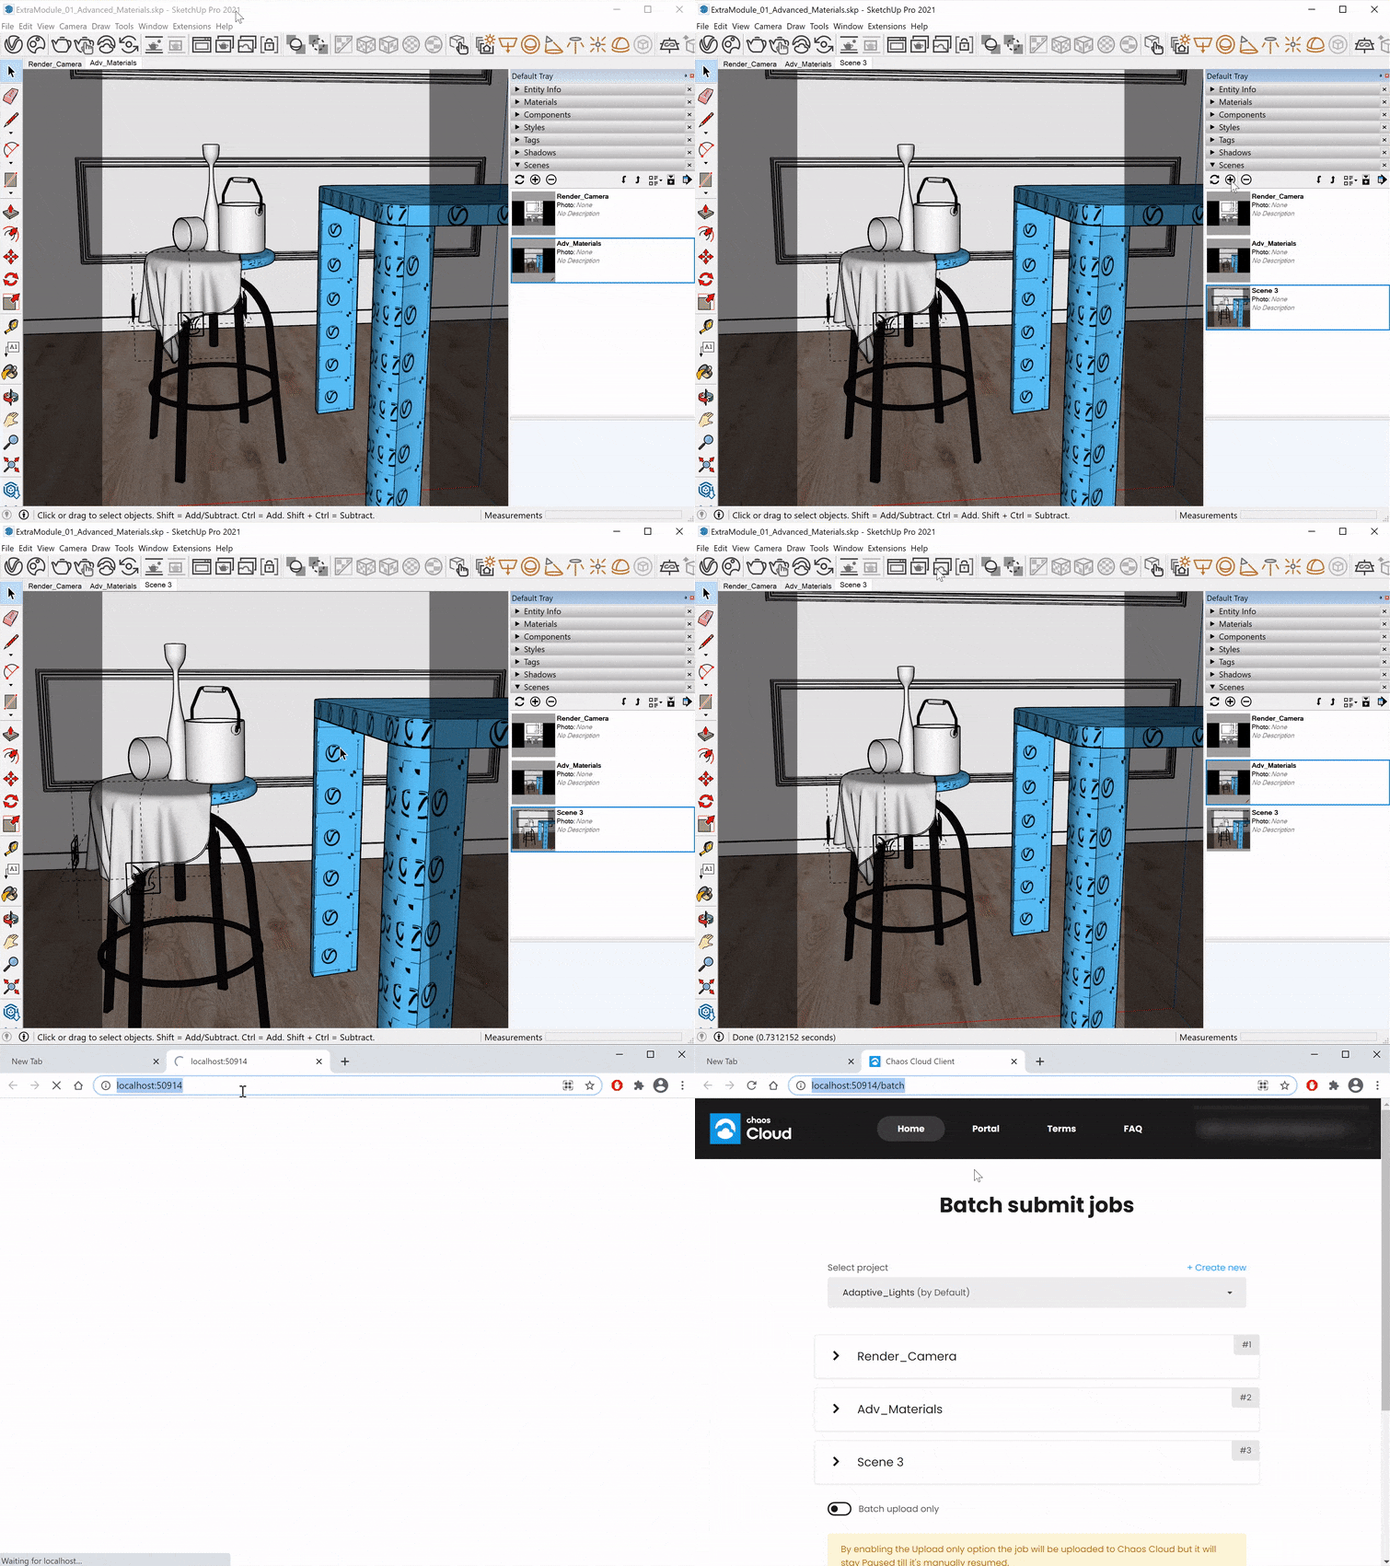
To submit a batch of render jobs from V-Ray for SketchUp, first add scenes from the Scenes rollout.
Then, the Chaos Cloud Batch Render button in the toolbar is unlocked. Press it to start submitting the scenes to the Cloud.
Once the Cloud app is ready with exporting the scenes, Chaos Cloud submission screen appears in your browser.
Submit from V-Ray for Revit
To submit a batch of render jobs from V-Ray for Revit, select the views you want to render from the drop-down menu of the View Selector.
Then, the Batch Render button in the toolbar is unlocked. Press it to start submitting the scenes to the Cloud.
Once the Cloud app is ready with exporting the scenes, Chaos Cloud submission screen appears in your browser.
Chaos Cloud Batch Render Options
Once all scenes are exported from the host app, Chaos Cloud opens the submission window in your browser. You can see a list of all submitted jobs.
You can select an already existing project or create a new one for the batch to be saved.
Each job can be renamed. A Job credit limit option is also available for each still image job. Currently, this is not supported for animations.
The Upload Only option can be enabled per job or for the whole batch of jobs. It uploads the job(s) in the Cloud, but they are paused until manually resumed.
When ready, press the Submit button. Chaos Cloud first lists a link for each job, but once they start rendering, a link for the Project appears.
For download options, see the Save and Download Options page.
Multiple Cameras from V-Ray for 3ds Max
Batch rendering in Chaos Cloud is also possible when multiple cameras are selected in 3ds Max. This rendering approach requires the latest V-Ray 5 Update 1.
First, add several cameras to your scene. Note that the current Chaos Cloud workflow is still the default workflow - i.e. Chaos Cloud renders the scene with the active view set in 3ds Max.
Jobs from active view look as before. Still jobs have only one frame. Animations list all frames and can be previewed individually or in a video preview.Press the Chaos Cloud button (). A note that multiple cameras are available is present on the Chaos Cloud page. To render them, add the cameras from the drop-down menu. Two filters are available below the drop-down:
All – Renders all cameras.
Clear – Clears all selected cameras and leaves the active view/perspective.If you do not want to render the different cameras, leave the drop-down empty, so that Chaos Cloud renders the job from the active view set in Render Setup > View to Render in 3ds Max.
You cannot render both the active view and the cameras in one render job. However, you can clone the job and render the active view or the different cameras in the cloned job.
The camera name is added to the name of the frames. The camera name position can be adjusted in the Naming Output convention.
The rest of the submission options are the same as the ones from the Chaos Cloud page. Press the Submit button.
The frame range, the aspect ratio, and the resolution are the same for all submitted cameras in one job.
If you want to render different cameras with different options, e.g. different frame range, different aspect ratio, or different resolution, clone the job and render only the needed cameras with the corresponding options.
A job with selected multiple cameras has several frames, each corresponding to a respective camera.
If the job is an animation, the frames are equal to the number of frames multiplied by the number of the selected cameras. The animation job has a video preview as well.


